Difference between revisions of "USB setup"
Brad Johnson (talk | contribs) (Created page with "=Basics= Lavry USB audio connections utilize the Operating System’s (OS) native drivers, making them “Plug and Play.” However, there are some settings and connection detail...") |
Brad Johnson (talk | contribs) |
||
| (7 intermediate revisions by 2 users not shown) | |||
| Line 1: | Line 1: | ||
=Basics= | =Basics= | ||
| − | Lavry USB audio connections utilize the Operating System’s (OS) native drivers, making them | + | Lavry USB audio connections utilize the Operating System’s (OS) native drivers, making them [[Plug and Play]]. However, there are some settings and connection details which must be considered to achieve optimum results. |
==Related Subjects== | ==Related Subjects== | ||
[[WASAPI]] | [[WASAPI]] | ||
[[USB]] | [[USB]] | ||
| + | |||
=USB Setup tips= | =USB Setup tips= | ||
Any USB audio device which uses the Native OS drivers will require checking the Operating System’s (OS) SOUND settings to confirm that the device is both connected properly and configured properly for audio input or output (I/O). It is important that these OS settings be made ''before'' launching any audio software that will use these devices. If changes to settings are required, in most cases they will not take effect while the audio software is open. It is recommended that all audio software be closed prior to making changes to the OS settings. | Any USB audio device which uses the Native OS drivers will require checking the Operating System’s (OS) SOUND settings to confirm that the device is both connected properly and configured properly for audio input or output (I/O). It is important that these OS settings be made ''before'' launching any audio software that will use these devices. If changes to settings are required, in most cases they will not take effect while the audio software is open. It is recommended that all audio software be closed prior to making changes to the OS settings. | ||
| − | *In | + | *In Windows® computers, the SOUND control panel is used for this purpose. |
| − | *In Apple® Macintosh® computers, the Audio MIDI Setup dialog is used for this purpose. | + | *In Apple® Macintosh® computers, the Audio MIDI Setup/Audio Devices dialog is used for this purpose. There are also some settings in the SOUND control panel for lesser used functions such as checking the function of the built-in digital audio optical output. Most setting which ''may'' need to be changed for optimum results are in the Audio MIDI Setup dialog. |
| − | The input device (“microphone”) must be selected as the Default Input | + | The input device (“microphone”) must be selected as the Default Input device to be automatically selected by recording software. |
| − | The output device (“speaker”) must be selected as the Default Output | + | The output device (“speaker”) must be selected as the Default Output to be automatically selected by playback or recording software. |
==Windows== | ==Windows== | ||
| − | The SOUND control panel can normally be accessed by right-clicking on the speaker symbol next to the clock on the taskbar and selecting Playback devices or Recording devices. | + | The SOUND control panel can normally be accessed by right-clicking on the speaker symbol next to the clock on the taskbar and selecting Playback devices or Recording devices. It can also be accessed through Control Panel in the Start Menu. |
===DA11=== | ===DA11=== | ||
There are settings in the SOUND control panel/Playback tab section which affect playback using the Lavry DA11. If the DA11 is powered and the OS is booted when the USB cable is plugged into the computer, the DA11 should appear in the list of devices with a speaker symbol and be titled “Speakers/Lavry DA.” A check mark in a green dot will appear on the corner of the speaker symbol if the DA11 is selected as the default device. A phone receiver symbol will appear in the green dot if it is enabled, but not selected as the default device. | There are settings in the SOUND control panel/Playback tab section which affect playback using the Lavry DA11. If the DA11 is powered and the OS is booted when the USB cable is plugged into the computer, the DA11 should appear in the list of devices with a speaker symbol and be titled “Speakers/Lavry DA.” A check mark in a green dot will appear on the corner of the speaker symbol if the DA11 is selected as the default device. A phone receiver symbol will appear in the green dot if it is enabled, but not selected as the default device. | ||
| − | To access the Configure, Set Default, and Properties functions, it is necessary to click on the area of the Lavry DA to select it, which is indicated by the area being highlighted | + | To access the Configure, Set Default, and Properties functions, it is necessary to click on the area of the Lavry DA to select it, which is indicated by the area being highlighted. By either clicking on the Properties button or double-clicking on the Lavry DA area, the Speaker Properties dialog is opened. |
[[File:SOUND DA11 USB.jpg]] | [[File:SOUND DA11 USB.jpg]] | ||
| − | The Speaker Properties dialog has four tabs: General, | + | The Speaker Properties dialog has four tabs: General, Levels, Enhancements, and Advanced. For optimum results check that the level is set to 100 % (the highest setting). |
Under the Advanced tab there are settings for the output [[Sample frequency]] (SF) and [[word length]]. For optimum results, set the SF to match the SF of the file being played and the Wordlength to 24 bit; even when playing back 16 bit files! The audio software will introduce dither when this setting is on 16 bit, which can affect the sound quality. The DA11 will accept the 24 bit output and reproduce it at full resolution as long as this setting is 24 bit.(*) | Under the Advanced tab there are settings for the output [[Sample frequency]] (SF) and [[word length]]. For optimum results, set the SF to match the SF of the file being played and the Wordlength to 24 bit; even when playing back 16 bit files! The audio software will introduce dither when this setting is on 16 bit, which can affect the sound quality. The DA11 will accept the 24 bit output and reproduce it at full resolution as long as this setting is 24 bit.(*) | ||
| + | |||
There are two other settings which can have a profound effect on the operation of the DA11; the Exclusive mode settings. There are two check boxes near the bottom of the Advanced tab for “Allow applications to take exclusive control of this devices” and “Give exclusive mode applications priority.” In the vast majority of cases, it is best to use the DA11 with these boxes checked for the most reliable operation. | There are two other settings which can have a profound effect on the operation of the DA11; the Exclusive mode settings. There are two check boxes near the bottom of the Advanced tab for “Allow applications to take exclusive control of this devices” and “Give exclusive mode applications priority.” In the vast majority of cases, it is best to use the DA11 with these boxes checked for the most reliable operation. | ||
| − | Doing so will make it impossible for other applications to output sound through the DA11 at the same time the exclusive mode application is running, which can be desirable for serious listening. However, this can also cause the DA11 to “not work” if a different application that has exclusive mode capability is launched prior to launching the desired audio playback software. As a step in trouble-shooting, if the DA11 setup appears to stop working after otherwise working dependably, you can try changing these settings to see if it makes any difference. If it does, this may indicate another audio application had control of the DA11 when it appeared to “not work.” | + | Doing so will make it impossible for other applications to output sound through the DA11 at the same time the exclusive mode application is running, which can be desirable for serious listening. However, this can also cause the DA11 to “not work” if a different application that has exclusive mode capability is launched prior to launching the desired audio playback software. As a step in trouble-shooting, if the DA11 setup appears to stop working after otherwise working dependably, you can try changing these settings to see if it makes any difference. If it does, this may indicate another audio application had control of the DA11 when it appeared to “not work.” For example, it is possible that some web browser audio software can cause this type of conflict. |
[[File:Properties DA11 USB no text.jpg]] | [[File:Properties DA11 USB no text.jpg]] | ||
| − | (*) Some audio recording software has advanced WDM drivers which effectively bypass the Windows mixer and Advanced tab settings. In this case, the sample rate setting as well as the level setting in the SOUND control panel may have no effect on the audio going to the DA11 | + | (*) Some audio ''recording'' software has advanced WDM drivers which effectively bypass the Windows mixer and Advanced tab settings. In this case, the sample rate setting as well as the level setting in the SOUND control panel may have no effect on the audio going to the DA11. This type of software typically bypasses the SOUND settings for the input side, as well. For ''playback only'', other types of drivers such as WASAPI also bypass the Windows audio software and make it unnecessary to manually change the output sample frequency in the SOUND control panel to achieve bit-accurate playback (the audio data which reaches the DA11 is the same as the audio data in the recorded file). |
====WASAPI==== | ====WASAPI==== | ||
| − | Some playback software offers the option to use WASAPI drivers. There are a number of advantages to this approach, | + | Some playback software offers the option to use [[WASAPI]] drivers. There are a number of advantages to this approach, which offers bit-accurate transmission of the audio from the playback software to the DA11. |
===AD11=== | ===AD11=== | ||
There are settings in the SOUND control panel/Recording tab section which affect recording when using the Lavry AD11. If the AD11 is powered and the OS is booted when the USB cable is plugged into the computer, the AD11 should appear in the list of devices with a microphone symbol and be titled “Microphone/Lavry ADC.” A check mark in a green dot will appear on the corner of the microphone symbol if the AD11 is selected as the default device. There is also an input bar meter on the right side of the Lavry ADC section which can be useful in troubleshooting. | There are settings in the SOUND control panel/Recording tab section which affect recording when using the Lavry AD11. If the AD11 is powered and the OS is booted when the USB cable is plugged into the computer, the AD11 should appear in the list of devices with a microphone symbol and be titled “Microphone/Lavry ADC.” A check mark in a green dot will appear on the corner of the microphone symbol if the AD11 is selected as the default device. There is also an input bar meter on the right side of the Lavry ADC section which can be useful in troubleshooting. | ||
| − | To access the Configure, Set Default, and Properties functions, it is necessary to click on the area of the Lavry ADC to select it, which is indicated by the area being highlighted | + | To access the Configure, Set Default, and Properties functions, it is necessary to click on the area of the Lavry ADC to select it, which is indicated by the area being highlighted. By either clicking on the Properties button or double-clicking on the Lavry ADC area, the Microphone Properties dialog is opened. |
[[File:SOUND AD11 USB.jpg]] | [[File:SOUND AD11 USB.jpg]] | ||
| − | The Microphone Properties dialog has four tabs: General, | + | The Microphone Properties dialog has four tabs: General, Levels, Enhancements, and Advanced. |
| + | For optimum results with Windows OS after XP and before 10, it may be(*) necessary to use a program like ASIO4ALL to allow full resolution audio to pass from the AD11 to the recording software. This is because the ability of the OS to recognize a [[line level]] USB audio device ended with Windows XP. In Windows 7 it is necessary to reduce the Levels tab/Level setting to the range of 3 - 4 percent to avoid clipping full level signals from the AD11, because the OS is expecting a microphone level signal. Attempting to record with the level set to 3 - 4 % (or +2.1 to +4.0[[dB]]) will result in significant loss in signal quality. | ||
| − | + | Windows 10 does allow the Level setting to be closer to the middle of the range, with 53 resulting in ~0.2dB loss and 54 resulting in ~0.1dB of gain. Results compare favorably with those using a 24 bit AES/XLR connection (the processing does not degrade the signal quality). | |
| − | Under the Advanced tab there are settings for the input Sample Frequency (SF) and word length. For optimum results, set the SF to match the SF of the AD11 and the Wordlength to 24 bit. Failure to set the SF in the SOUND control panel may result in either a low quality sample frequency conversion being applied to the incoming digital audio, or an error message from the recording program about a sample frequency mismatch. | + | [[File: Properties_AD11_Levels_7-5-17.jpg]] |
| + | |||
| + | Under the Advanced tab there are settings for the input Sample Frequency (SF) and word length. For optimum results, set the SF to match the SF of the AD11 as well as the recording software, and the Wordlength to 24 bit. Failure to set the SF in the SOUND control panel may result in either a low quality sample frequency conversion being applied to the incoming digital audio, or an error message from the recording program about a sample frequency mismatch. | ||
There are two other settings which can have a profound effect on the operation of the AD11; the Exclusive mode settings. There are two check boxes near the bottom of the Advanced tab for “Allow applications to take exclusive control of this devices” and “Give exclusive mode applications priority.” In the vast majority of cases, it is best to use the AD11 with these boxes checked for the most reliable operation. | There are two other settings which can have a profound effect on the operation of the AD11; the Exclusive mode settings. There are two check boxes near the bottom of the Advanced tab for “Allow applications to take exclusive control of this devices” and “Give exclusive mode applications priority.” In the vast majority of cases, it is best to use the AD11 with these boxes checked for the most reliable operation. | ||
| − | Doing so will make it impossible for other applications to | + | Doing so will make it impossible for other applications to receive audio from the AD11 at the same time the exclusive mode application is running, which can be desirable for serious recording. However, this can also cause the AD11 to “not work” if a different application that has exclusive mode capability is launched prior to launching the desired audio recording software. As a step in trouble-shooting, if the AD11 setup appears to stop working after otherwise working dependably, you can try changing these settings to see if it makes any difference. If it does, this may indicate another audio application had control of the AD11 when it appeared to “not work.” |
[[File:Properties AD11 SF.jpg]] | [[File:Properties AD11 SF.jpg]] | ||
| Line 56: | Line 61: | ||
===ASIO4ALL=== | ===ASIO4ALL=== | ||
| − | When recording with the Lavry AD11 in a Windows computer using audio software with ASIO capability, we recommend using ASIO4ALL or similar WDM/ASIO software to make the AD11 appear as an ASIO device. Changes to the Windows OS made | + | When recording with the Lavry AD11 in a Windows 7 computer using audio software with ASIO capability, we recommend using ASIO4ALL or similar WDM/ASIO software to make the AD11 appear as an ASIO device. Changes to the Windows OS made Windows 7 incompatible with high quality line level USB input devices by allowing only microphone level adjustment in the SOUND control panel. In order to achieve full quality, unless the recording software uses advanced WDM drivers which effectively bypass theses settings, this limitation in Windows 7 makes it necessary to use a program like ASIO4ALL. The other advantage of using ASIO4ALL is the ability to make “composite audio devices” which appear to the recording software as a single ASIO device. |
| + | |||
| + | Windows 10 does allow full 24 bit quality with WDM drivers when the Level setting is 53 or 54. | ||
| + | *Please see the document titled “ASIO4ALL Setup English - Basic, Reaper, SonarX1, WaveLab” under the AD11 product page Downloads tab for details on setting up ASIO4ALL or [http://www.lavryengineering.com/pdfs/lavry-asio4all-setup-english.pdf Click here] | ||
*If the recording software has advanced WDM drivers which bypass the Windows SOUND settings, using ASIO4ALL is not necessary to achieve high quality results. | *If the recording software has advanced WDM drivers which bypass the Windows SOUND settings, using ASIO4ALL is not necessary to achieve high quality results. | ||
| Line 66: | Line 74: | ||
[[File:Locate Audio MIDI Setup.jpg]] | [[File:Locate Audio MIDI Setup.jpg]] | ||
| − | If the DA11 is powered and the USB cable is then connected to the computer, it should appear as “Lavry DA 0 in/2 out” in the left pane of the Audio Devices dialog. To select it as a sound output device, click on the gear symbol at the bottom and select “Use this device for sound output.” A small speaker symbol should appear on the right side of the DA11 section to indicate it is a sound output device. | + | If the DA11 is powered and the USB cable is then connected to the computer, it should appear as “Lavry DA 0 in/2 out” next to a USB symbol in the left pane of the Audio MIDI Setup/Audio Devices dialog. To select the Lavry DA, click on the area in the left pane. The area is highlighted to indicate that it is selected and that the right pane refers to this device’s settings. |
| + | |||
| + | To select it as a sound output device, click on the gear symbol at the bottom and select “Use this device for sound output.” A small speaker symbol should appear on the right side of the DA11 section to indicate it is a sound output device. | ||
[[File:DA11 AM Sound Output.jpg]] | [[File:DA11 AM Sound Output.jpg]] | ||
| Line 75: | Line 85: | ||
In some cases, playback software will use custom Core Audio software which effectively bypasses these settings. This can be confirmed by looking at the Sample Frequency displayed in the DA11 Volume window when the DA11 is in Setting mode. | In some cases, playback software will use custom Core Audio software which effectively bypasses these settings. This can be confirmed by looking at the Sample Frequency displayed in the DA11 Volume window when the DA11 is in Setting mode. | ||
| − | *If the DA11 always displays the same SF as the file being played, the software has custom | + | *If the DA11 always displays the same SF as the file being played, the software has custom audio drivers and it ''is not'' necessary to manually set the output SF in the Audio MIDI Setup for optimum results. |
*If the DA11 always displays the same SF as the Audio MIDI Setup Format instead of the SF of the file, the software does not have custom software and it ''is necessary to manually set the output SF'' in the Audio MIDI Setup for optimum results. | *If the DA11 always displays the same SF as the Audio MIDI Setup Format instead of the SF of the file, the software does not have custom software and it ''is necessary to manually set the output SF'' in the Audio MIDI Setup for optimum results. | ||
====Basic Playback with Optical==== | ====Basic Playback with Optical==== | ||
| − | The DA11 can also be connected via the Macinotsh computer’s built-in optical digital audio output. The physical connection is made using a 3.5mm “mini” to [[Toslink]] fiber interconnect plugged into the headphone jack of the computer. The format of the signal is [S-PDIF]. | + | The DA11 can also be connected via the Macinotsh computer’s built-in optical digital audio output. The physical connection is made using a 3.5mm “mini” to [[Toslink]] fiber interconnect plugged into the headphone jack of the computer. The format of the signal is [[S-PDIF]]. |
*The optical output is only enabled when an optical connector is inserted in the headphone jack. | *The optical output is only enabled when an optical connector is inserted in the headphone jack. | ||
The Audio MIDI settings are very similar to the USB connected settings, with the exception that the computer does not “know” what is connected to the other end of the fiber interconnect. This results in the optical output appearing as the “Built-in Output” in the left pane of the Audio Devices dialog and the SOURCE displayed in the right pane as “Digital Out.” If the fiber interconnect is not inserted, the SOURCE will display “Internal Speakers.” | The Audio MIDI settings are very similar to the USB connected settings, with the exception that the computer does not “know” what is connected to the other end of the fiber interconnect. This results in the optical output appearing as the “Built-in Output” in the left pane of the Audio Devices dialog and the SOURCE displayed in the right pane as “Digital Out.” If the fiber interconnect is not inserted, the SOURCE will display “Internal Speakers.” | ||
| Line 87: | Line 97: | ||
*For basic playback, it is not necessary to create an aggregate device. | *For basic playback, it is not necessary to create an aggregate device. | ||
*To record with the AD11 and DA11, an aggregate device must be created. Programs like Protools® may create their own aggregate device, which is required for use in place of a Core Audio aggregate device. Even if you are using only the AD11 connected via USB, an aggregate device would need to be created with the AD11 for input and the computer’s built-in audio as an output, if no other playback device is available. Please note that the Protools aggregate device does not allow the AD11 and DA11 to be connected via USB simultaneously. The DA11 would need to be connected using the Macintosh’s built-in [[optical]] output, which can be combined with the USB connected AD11 in the Protools aggregate device. | *To record with the AD11 and DA11, an aggregate device must be created. Programs like Protools® may create their own aggregate device, which is required for use in place of a Core Audio aggregate device. Even if you are using only the AD11 connected via USB, an aggregate device would need to be created with the AD11 for input and the computer’s built-in audio as an output, if no other playback device is available. Please note that the Protools aggregate device does not allow the AD11 and DA11 to be connected via USB simultaneously. The DA11 would need to be connected using the Macintosh’s built-in [[optical]] output, which can be combined with the USB connected AD11 in the Protools aggregate device. | ||
| − | For details on settings, please see the document “Connecting to ProTools 9 or 10 (PDF)” which is available under the AD11 product page Downloads tab for details on Audio MIDI settings, | + | For details on settings, please see the document “Connecting to ProTools 9 or 10 (PDF)” which is available under the AD11 product page Downloads tab for details on Audio MIDI settings, [http://www.lavryengineering.com/pdfs/lavry-ad11-da11-protools.pdf or click here]. |
=Known Issues= | =Known Issues= | ||
==Output Sample Frequency Settings== | ==Output Sample Frequency Settings== | ||
| − | Both Windows and Apple audio require manually setting the output sample Frequency (SF) when used with basic plug & play audio software. This is to allow support of multiple software playback sources with different SF’s to play out through the “speakers” simultaneously. One example is a system sound indicating an error message occurring when using both a word processor and an audio playback program. The system sound may be at 32kHz and the music file at 96kHz, so the OS will automatically introduce sample frequency conversion (SFC) on | + | Both Windows and Apple audio require manually setting the output sample Frequency (SF) when used with basic plug & play audio software. This is to allow support of multiple software playback sources with different SF’s to play out through the “speakers” simultaneously. One example is a system sound indicating an error message occurring when using both a word processor and an audio playback program. The system sound may be at 32kHz and the music file at 96kHz, so the OS will automatically introduce sample frequency conversion (SFC) on any source which does not match the output SF setting in the SOUND control panel (Audio MIDI Setup/Audio Devices in Apple OS). |
Some recording programs effectively bypass the Windows or Apple sound settings and make it unnecessary to manually set them in the SOUND control panel to achieve good results. Other programs have advanced drivers such as WASAPI for Windows, or custom Core Audio drivers for Apple OS which also bypass these settings. | Some recording programs effectively bypass the Windows or Apple sound settings and make it unnecessary to manually set them in the SOUND control panel to achieve good results. Other programs have advanced drivers such as WASAPI for Windows, or custom Core Audio drivers for Apple OS which also bypass these settings. | ||
Although the Windows SFC is reasonably good quality, most discriminating listeners will prefer to listen to playback at the same SF the file was recorded (no SFC). Most feel the Apple OS SFC is not “high fidelity” and are not happy with the results unless the output SF is set manually or the playback software has advanced drivers to bypass this function. | Although the Windows SFC is reasonably good quality, most discriminating listeners will prefer to listen to playback at the same SF the file was recorded (no SFC). Most feel the Apple OS SFC is not “high fidelity” and are not happy with the results unless the output SF is set manually or the playback software has advanced drivers to bypass this function. | ||
| Line 97: | Line 107: | ||
The Lavry AD11 and DA11 utilize the OS native drivers, so there is no driver software to install. | The Lavry AD11 and DA11 utilize the OS native drivers, so there is no driver software to install. | ||
In some instances, other USB audio interfaces may use their own USB driver software. It is possible that installing third party drivers may overwrite OS driver or audio software. If you have checked that all settings appear to be correct, have previously installed USB audio software from a company other than Lavry, Microsoft, or Apple, and cannot achieve reliable operation; it is possible that the OS USB software has been replaced or corrupted by the installation of the third party software. If this occurs, try uninstalling any third party software and unplug the Lavry device connected via USB. With the Lavry device powered and the OS booted, re-connect the USB cable from the Lavry device. | In some instances, other USB audio interfaces may use their own USB driver software. It is possible that installing third party drivers may overwrite OS driver or audio software. If you have checked that all settings appear to be correct, have previously installed USB audio software from a company other than Lavry, Microsoft, or Apple, and cannot achieve reliable operation; it is possible that the OS USB software has been replaced or corrupted by the installation of the third party software. If this occurs, try uninstalling any third party software and unplug the Lavry device connected via USB. With the Lavry device powered and the OS booted, re-connect the USB cable from the Lavry device. | ||
| − | Go to the OS SOUND control dialog and confirm that the Lavry device appears as an input or output device and that it is selected as the default I/O device before launching any audio software. | + | Go to the OS SOUND control dialog in Windows OS or the Audio MIDI Setup/Audio Devices in Apple OS and confirm that the Lavry device appears as an input or output device and that it is selected as the default I/O device before launching any audio software. |
==Physical Connection== | ==Physical Connection== | ||
In some instances certain USB ports on a single computer may allow more reliable operation than other USB ports on the same computer. If you experience problems with the audio, try using a different USB port. With the Lavry device powered and the OS booted, re-connect the USB cable from the Lavry device. | In some instances certain USB ports on a single computer may allow more reliable operation than other USB ports on the same computer. If you experience problems with the audio, try using a different USB port. With the Lavry device powered and the OS booted, re-connect the USB cable from the Lavry device. | ||
===Seeing USB Devices on a Windows Computer=== | ===Seeing USB Devices on a Windows Computer=== | ||
| − | Windows computers have a control panel named '''Device Manager''', which can be accessed through the link to the Control | + | Windows computers have a control panel named '''Device Manager''', which can be accessed through the link to the Control Panel, or by right-clicking on the Computer link in the Start menu and selecting '''Properties'''. Using the right-click method will open the '''System''' control panel and on the left side there is a link for '''Device Manager'''. |
| − | The first step is to change the View setting to | + | The first step is to change the View setting to “Devices by Connection.” |
| Line 131: | Line 141: | ||
If you want to connect the AD11 and DA11 to the same computer using USB, be aware that this may not work with all computers. If you get a warning regarding bandwidth limitations, or simply cannot get audio into and out of the computer via the Lavry devices, try changing one of the USB connections to a different port. For example, instead of using two front panel USB ports, try using one front and one rear panel ports. | If you want to connect the AD11 and DA11 to the same computer using USB, be aware that this may not work with all computers. If you get a warning regarding bandwidth limitations, or simply cannot get audio into and out of the computer via the Lavry devices, try changing one of the USB connections to a different port. For example, instead of using two front panel USB ports, try using one front and one rear panel ports. | ||
| − | Lavry recommends using an alternative means for connection of the DA11 when the AD11 is connected via USB whenever possible. For example, most Macintosh computers have an optical digital audio output built into the headphone jack. Many PC’s have [[SPDIF]] [[optical]] or [[coaxial]] connections available through the on-board sound. Please note that the output SOUND control panel settings for output SF and Wordlength typically affect on-board sound SPDIF connections in a manner similar to USB. | + | Lavry recommends using an alternative means for connection of the DA11 when the AD11 is connected via USB whenever possible. For example, most Macintosh computers have an optical digital audio output built into the headphone jack. Many PC’s have [[SPDIF]] [[optical]] or [[coaxial]] connections available through the on-board sound. Please note that the output SOUND control panel settings (Audio MIDI Setup/Audio Devices settings in Apple OS) for output SF and Wordlength typically affect on-board sound SPDIF connections in a manner similar to USB. |
| − | ProTools Macintosh users will need to use this approach because the ProTools aggregate device does not support connection of both the AD11 and DA11 simultaneously. | + | ProTools Macintosh users will need to use this approach because the ProTools aggregate device does not support USB connection of both the AD11 and DA11 simultaneously. |
==Changes to the OS== | ==Changes to the OS== | ||
OS manufacturers periodically update or release new versions of their software, which can result in changes to the operation of the USB audio. Because the AD11 and DA11 are Class 1 Compliant audio devices, changes to the OS normally do not affect them in the manner third party drivers are affected. | OS manufacturers periodically update or release new versions of their software, which can result in changes to the operation of the USB audio. Because the AD11 and DA11 are Class 1 Compliant audio devices, changes to the OS normally do not affect them in the manner third party drivers are affected. | ||
| − | However, | + | However, third party drivers installed after the OS update could affect the operation of the Lavry unit, if these drivers replace the original OS USB audio drivers. Third party drivers may be included in the software installation of some audio software. |
Latest revision as of 18:10, 5 July 2017
Basics
Lavry USB audio connections utilize the Operating System’s (OS) native drivers, making them Plug and Play. However, there are some settings and connection details which must be considered to achieve optimum results.
Related Subjects
USB Setup tips
Any USB audio device which uses the Native OS drivers will require checking the Operating System’s (OS) SOUND settings to confirm that the device is both connected properly and configured properly for audio input or output (I/O). It is important that these OS settings be made before launching any audio software that will use these devices. If changes to settings are required, in most cases they will not take effect while the audio software is open. It is recommended that all audio software be closed prior to making changes to the OS settings.
- In Windows® computers, the SOUND control panel is used for this purpose.
- In Apple® Macintosh® computers, the Audio MIDI Setup/Audio Devices dialog is used for this purpose. There are also some settings in the SOUND control panel for lesser used functions such as checking the function of the built-in digital audio optical output. Most setting which may need to be changed for optimum results are in the Audio MIDI Setup dialog.
The input device (“microphone”) must be selected as the Default Input device to be automatically selected by recording software. The output device (“speaker”) must be selected as the Default Output to be automatically selected by playback or recording software.
Windows
The SOUND control panel can normally be accessed by right-clicking on the speaker symbol next to the clock on the taskbar and selecting Playback devices or Recording devices. It can also be accessed through Control Panel in the Start Menu.
DA11
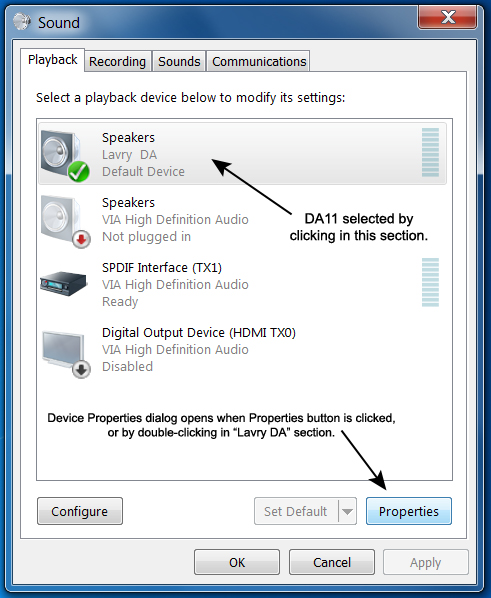
There are settings in the SOUND control panel/Playback tab section which affect playback using the Lavry DA11. If the DA11 is powered and the OS is booted when the USB cable is plugged into the computer, the DA11 should appear in the list of devices with a speaker symbol and be titled “Speakers/Lavry DA.” A check mark in a green dot will appear on the corner of the speaker symbol if the DA11 is selected as the default device. A phone receiver symbol will appear in the green dot if it is enabled, but not selected as the default device.
To access the Configure, Set Default, and Properties functions, it is necessary to click on the area of the Lavry DA to select it, which is indicated by the area being highlighted. By either clicking on the Properties button or double-clicking on the Lavry DA area, the Speaker Properties dialog is opened.
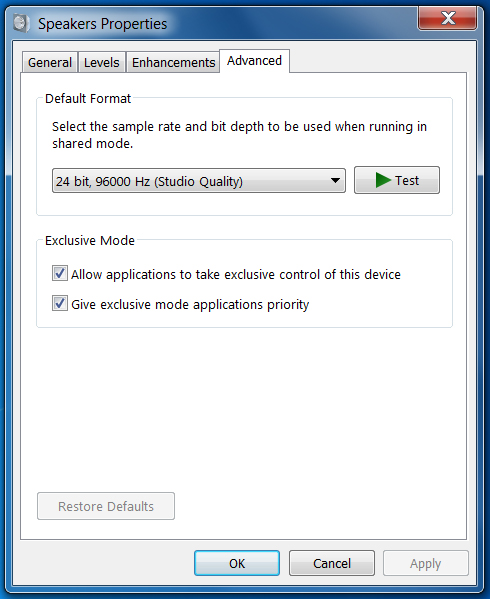
The Speaker Properties dialog has four tabs: General, Levels, Enhancements, and Advanced. For optimum results check that the level is set to 100 % (the highest setting). Under the Advanced tab there are settings for the output Sample frequency (SF) and word length. For optimum results, set the SF to match the SF of the file being played and the Wordlength to 24 bit; even when playing back 16 bit files! The audio software will introduce dither when this setting is on 16 bit, which can affect the sound quality. The DA11 will accept the 24 bit output and reproduce it at full resolution as long as this setting is 24 bit.(*)
There are two other settings which can have a profound effect on the operation of the DA11; the Exclusive mode settings. There are two check boxes near the bottom of the Advanced tab for “Allow applications to take exclusive control of this devices” and “Give exclusive mode applications priority.” In the vast majority of cases, it is best to use the DA11 with these boxes checked for the most reliable operation.
Doing so will make it impossible for other applications to output sound through the DA11 at the same time the exclusive mode application is running, which can be desirable for serious listening. However, this can also cause the DA11 to “not work” if a different application that has exclusive mode capability is launched prior to launching the desired audio playback software. As a step in trouble-shooting, if the DA11 setup appears to stop working after otherwise working dependably, you can try changing these settings to see if it makes any difference. If it does, this may indicate another audio application had control of the DA11 when it appeared to “not work.” For example, it is possible that some web browser audio software can cause this type of conflict.
(*) Some audio recording software has advanced WDM drivers which effectively bypass the Windows mixer and Advanced tab settings. In this case, the sample rate setting as well as the level setting in the SOUND control panel may have no effect on the audio going to the DA11. This type of software typically bypasses the SOUND settings for the input side, as well. For playback only, other types of drivers such as WASAPI also bypass the Windows audio software and make it unnecessary to manually change the output sample frequency in the SOUND control panel to achieve bit-accurate playback (the audio data which reaches the DA11 is the same as the audio data in the recorded file).
WASAPI
Some playback software offers the option to use WASAPI drivers. There are a number of advantages to this approach, which offers bit-accurate transmission of the audio from the playback software to the DA11.
AD11
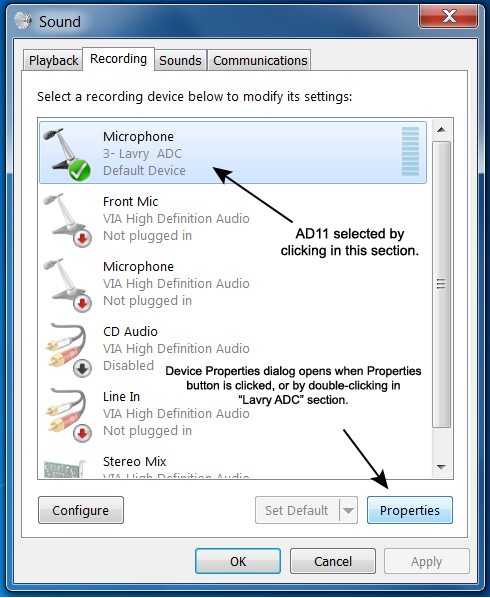
There are settings in the SOUND control panel/Recording tab section which affect recording when using the Lavry AD11. If the AD11 is powered and the OS is booted when the USB cable is plugged into the computer, the AD11 should appear in the list of devices with a microphone symbol and be titled “Microphone/Lavry ADC.” A check mark in a green dot will appear on the corner of the microphone symbol if the AD11 is selected as the default device. There is also an input bar meter on the right side of the Lavry ADC section which can be useful in troubleshooting.
To access the Configure, Set Default, and Properties functions, it is necessary to click on the area of the Lavry ADC to select it, which is indicated by the area being highlighted. By either clicking on the Properties button or double-clicking on the Lavry ADC area, the Microphone Properties dialog is opened.
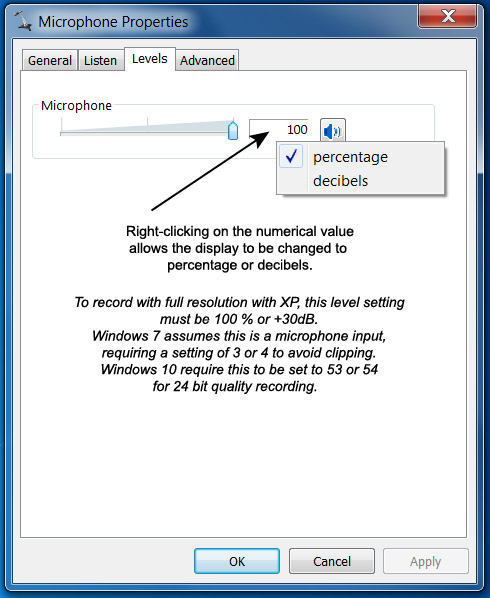
The Microphone Properties dialog has four tabs: General, Levels, Enhancements, and Advanced. For optimum results with Windows OS after XP and before 10, it may be(*) necessary to use a program like ASIO4ALL to allow full resolution audio to pass from the AD11 to the recording software. This is because the ability of the OS to recognize a line level USB audio device ended with Windows XP. In Windows 7 it is necessary to reduce the Levels tab/Level setting to the range of 3 - 4 percent to avoid clipping full level signals from the AD11, because the OS is expecting a microphone level signal. Attempting to record with the level set to 3 - 4 % (or +2.1 to +4.0dB) will result in significant loss in signal quality.
Windows 10 does allow the Level setting to be closer to the middle of the range, with 53 resulting in ~0.2dB loss and 54 resulting in ~0.1dB of gain. Results compare favorably with those using a 24 bit AES/XLR connection (the processing does not degrade the signal quality).
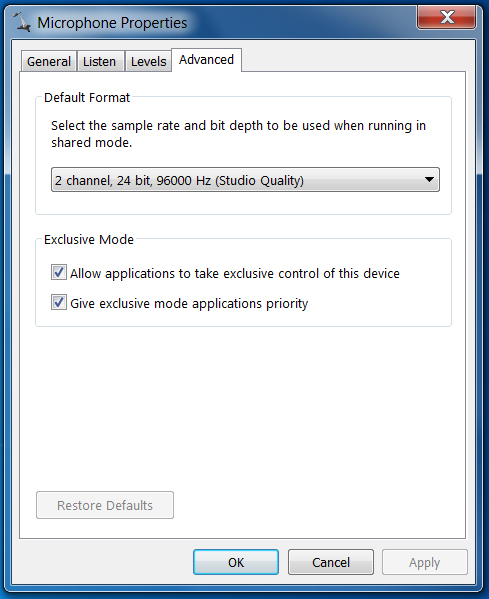
Under the Advanced tab there are settings for the input Sample Frequency (SF) and word length. For optimum results, set the SF to match the SF of the AD11 as well as the recording software, and the Wordlength to 24 bit. Failure to set the SF in the SOUND control panel may result in either a low quality sample frequency conversion being applied to the incoming digital audio, or an error message from the recording program about a sample frequency mismatch.
There are two other settings which can have a profound effect on the operation of the AD11; the Exclusive mode settings. There are two check boxes near the bottom of the Advanced tab for “Allow applications to take exclusive control of this devices” and “Give exclusive mode applications priority.” In the vast majority of cases, it is best to use the AD11 with these boxes checked for the most reliable operation.
Doing so will make it impossible for other applications to receive audio from the AD11 at the same time the exclusive mode application is running, which can be desirable for serious recording. However, this can also cause the AD11 to “not work” if a different application that has exclusive mode capability is launched prior to launching the desired audio recording software. As a step in trouble-shooting, if the AD11 setup appears to stop working after otherwise working dependably, you can try changing these settings to see if it makes any difference. If it does, this may indicate another audio application had control of the AD11 when it appeared to “not work.”
(*) Some audio recording software has advanced WDM drivers which effectively bypass the Windows mixer and Advanced tab settings. In this case, the sample rate setting as well as the level setting in the SOUND control panel may have no effect on the audio from the AD11. In these cases, it is not necessary to use ASIO4ALL to get good results. This type of software typically bypasses the SOUND settings for the output side, as well.
ASIO4ALL
When recording with the Lavry AD11 in a Windows 7 computer using audio software with ASIO capability, we recommend using ASIO4ALL or similar WDM/ASIO software to make the AD11 appear as an ASIO device. Changes to the Windows OS made Windows 7 incompatible with high quality line level USB input devices by allowing only microphone level adjustment in the SOUND control panel. In order to achieve full quality, unless the recording software uses advanced WDM drivers which effectively bypass theses settings, this limitation in Windows 7 makes it necessary to use a program like ASIO4ALL. The other advantage of using ASIO4ALL is the ability to make “composite audio devices” which appear to the recording software as a single ASIO device.
Windows 10 does allow full 24 bit quality with WDM drivers when the Level setting is 53 or 54.
- Please see the document titled “ASIO4ALL Setup English - Basic, Reaper, SonarX1, WaveLab” under the AD11 product page Downloads tab for details on setting up ASIO4ALL or Click here
- If the recording software has advanced WDM drivers which bypass the Windows SOUND settings, using ASIO4ALL is not necessary to achieve high quality results.
Apple OS
DA11
Basic Playback with USB
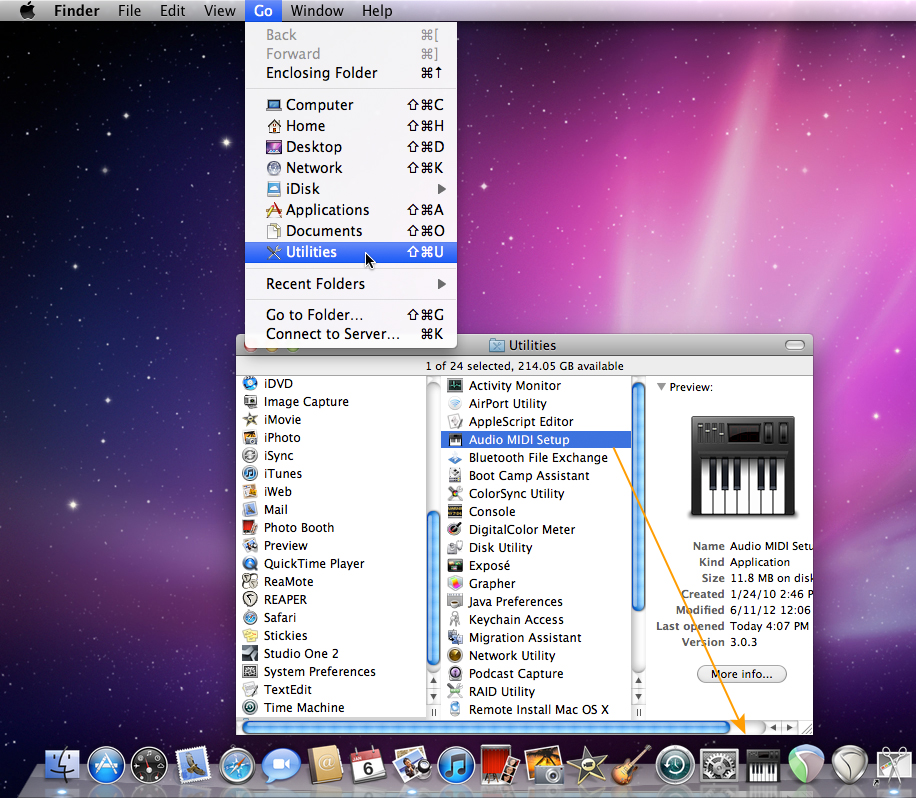
For basic playback, there are only a few settings which can affect playback quality. These settings are found in the Audio MIDI setup dialog. The Audio MIDI Setup can be accessed by looking in the Finder GO menu for UTILITIES. It is recommended that the Audio MIDI Setup be dragged to the desktop Dock to enable easy access in the future.
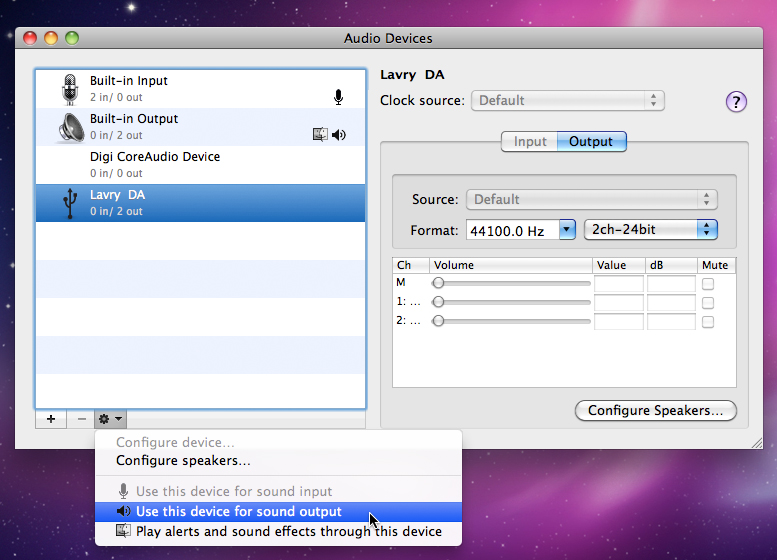
If the DA11 is powered and the USB cable is then connected to the computer, it should appear as “Lavry DA 0 in/2 out” next to a USB symbol in the left pane of the Audio MIDI Setup/Audio Devices dialog. To select the Lavry DA, click on the area in the left pane. The area is highlighted to indicate that it is selected and that the right pane refers to this device’s settings.
To select it as a sound output device, click on the gear symbol at the bottom and select “Use this device for sound output.” A small speaker symbol should appear on the right side of the DA11 section to indicate it is a sound output device.
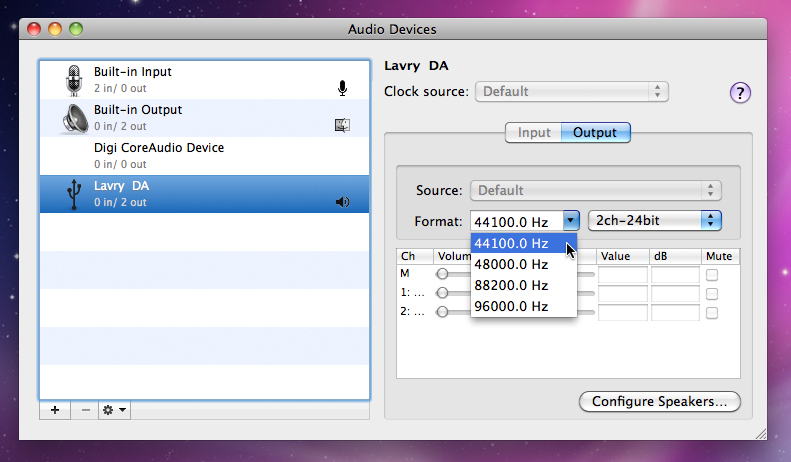
There are settings for the output Sample frequency (SF) and word length in the right pane of the Audio Devices dialog. Please note that these settings apply to the device which is selected in the left pane, and will change as different devices are selected in the left pane. For optimum results, set the SF to match the SF of the file being played and the Wordlength to 24 bit; even when playing back 16 bit files! The audio software will introduce dither when this setting is on 16 bit, which can affect the sound quality. The DA11 will accept the 24 bit output and reproduce it at full resolution as long as this setting is 24 bit.
In some cases, playback software will use custom Core Audio software which effectively bypasses these settings. This can be confirmed by looking at the Sample Frequency displayed in the DA11 Volume window when the DA11 is in Setting mode.
- If the DA11 always displays the same SF as the file being played, the software has custom audio drivers and it is not necessary to manually set the output SF in the Audio MIDI Setup for optimum results.
- If the DA11 always displays the same SF as the Audio MIDI Setup Format instead of the SF of the file, the software does not have custom software and it is necessary to manually set the output SF in the Audio MIDI Setup for optimum results.
Basic Playback with Optical
The DA11 can also be connected via the Macinotsh computer’s built-in optical digital audio output. The physical connection is made using a 3.5mm “mini” to Toslink fiber interconnect plugged into the headphone jack of the computer. The format of the signal is S-PDIF.
- The optical output is only enabled when an optical connector is inserted in the headphone jack.
The Audio MIDI settings are very similar to the USB connected settings, with the exception that the computer does not “know” what is connected to the other end of the fiber interconnect. This results in the optical output appearing as the “Built-in Output” in the left pane of the Audio Devices dialog and the SOURCE displayed in the right pane as “Digital Out.” If the fiber interconnect is not inserted, the SOURCE will display “Internal Speakers.” Consideration of the Output SF and Wordlength are similar to the USB connection, and may have an audible effect on the output of the DA11. Please see the “Basic Playback with USB” section (above) for details on these Output settings.
Recording with the AD11
The Audio MIDI Setup dialog has a provision to create an Aggregate Device to combine input and output devices with different physical connections. By doing so, these separate devices appear to the recording software as a single audio interface.
- For basic playback, it is not necessary to create an aggregate device.
- To record with the AD11 and DA11, an aggregate device must be created. Programs like Protools® may create their own aggregate device, which is required for use in place of a Core Audio aggregate device. Even if you are using only the AD11 connected via USB, an aggregate device would need to be created with the AD11 for input and the computer’s built-in audio as an output, if no other playback device is available. Please note that the Protools aggregate device does not allow the AD11 and DA11 to be connected via USB simultaneously. The DA11 would need to be connected using the Macintosh’s built-in optical output, which can be combined with the USB connected AD11 in the Protools aggregate device.
For details on settings, please see the document “Connecting to ProTools 9 or 10 (PDF)” which is available under the AD11 product page Downloads tab for details on Audio MIDI settings, or click here.
Known Issues
Output Sample Frequency Settings
Both Windows and Apple audio require manually setting the output sample Frequency (SF) when used with basic plug & play audio software. This is to allow support of multiple software playback sources with different SF’s to play out through the “speakers” simultaneously. One example is a system sound indicating an error message occurring when using both a word processor and an audio playback program. The system sound may be at 32kHz and the music file at 96kHz, so the OS will automatically introduce sample frequency conversion (SFC) on any source which does not match the output SF setting in the SOUND control panel (Audio MIDI Setup/Audio Devices in Apple OS). Some recording programs effectively bypass the Windows or Apple sound settings and make it unnecessary to manually set them in the SOUND control panel to achieve good results. Other programs have advanced drivers such as WASAPI for Windows, or custom Core Audio drivers for Apple OS which also bypass these settings. Although the Windows SFC is reasonably good quality, most discriminating listeners will prefer to listen to playback at the same SF the file was recorded (no SFC). Most feel the Apple OS SFC is not “high fidelity” and are not happy with the results unless the output SF is set manually or the playback software has advanced drivers to bypass this function.
Drivers
The Lavry AD11 and DA11 utilize the OS native drivers, so there is no driver software to install. In some instances, other USB audio interfaces may use their own USB driver software. It is possible that installing third party drivers may overwrite OS driver or audio software. If you have checked that all settings appear to be correct, have previously installed USB audio software from a company other than Lavry, Microsoft, or Apple, and cannot achieve reliable operation; it is possible that the OS USB software has been replaced or corrupted by the installation of the third party software. If this occurs, try uninstalling any third party software and unplug the Lavry device connected via USB. With the Lavry device powered and the OS booted, re-connect the USB cable from the Lavry device. Go to the OS SOUND control dialog in Windows OS or the Audio MIDI Setup/Audio Devices in Apple OS and confirm that the Lavry device appears as an input or output device and that it is selected as the default I/O device before launching any audio software.
Physical Connection
In some instances certain USB ports on a single computer may allow more reliable operation than other USB ports on the same computer. If you experience problems with the audio, try using a different USB port. With the Lavry device powered and the OS booted, re-connect the USB cable from the Lavry device.
Seeing USB Devices on a Windows Computer
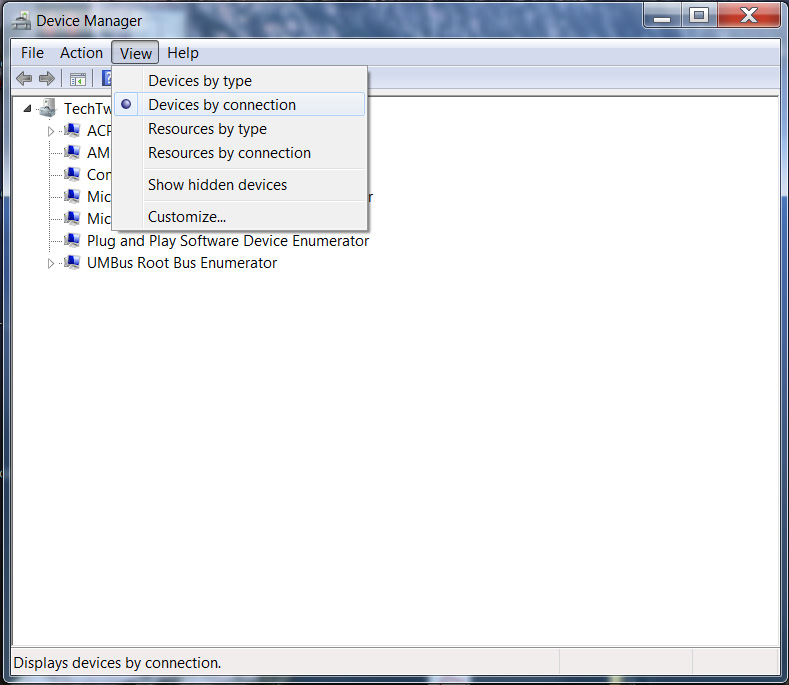
Windows computers have a control panel named Device Manager, which can be accessed through the link to the Control Panel, or by right-clicking on the Computer link in the Start menu and selecting Properties. Using the right-click method will open the System control panel and on the left side there is a link for Device Manager. The first step is to change the View setting to “Devices by Connection.”
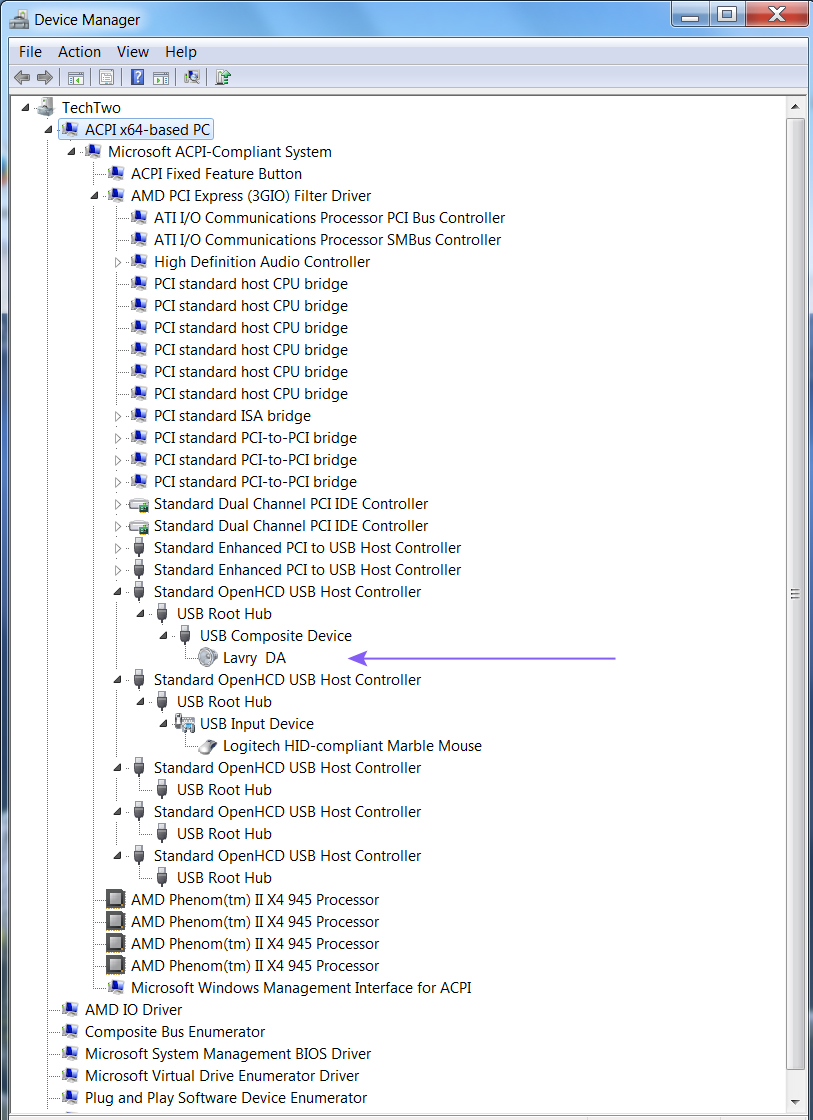
You can then expand the tree in the USB section to show all connected devices by clicking on any triangular arrow symbols next to the USB Controllers.
In this illustration, the Lavry DA is connected to a USB port which is not used by any other devices. This is the ideal scenario, but in some cases it may not be possible. Try to avoid connection to a USB port shared by other high bandwidth or high priority devices such as wireless mouse/keyboards or WiFi connections.
Seeing USB Devices on an Apple Macintosh Computer
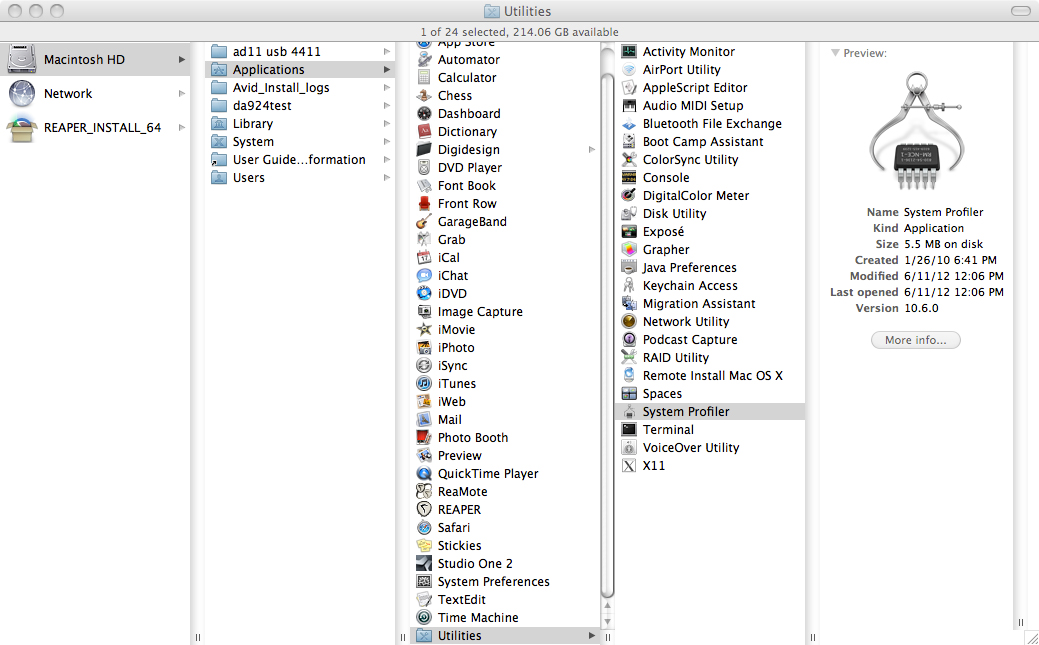
Depending on the OS version, Apple Macintosh computers have a dialog named System Information or System Profiler, which can be accessed through the Finder by searching for it by name or by selecting Utilities from the FINDER/GO menu.
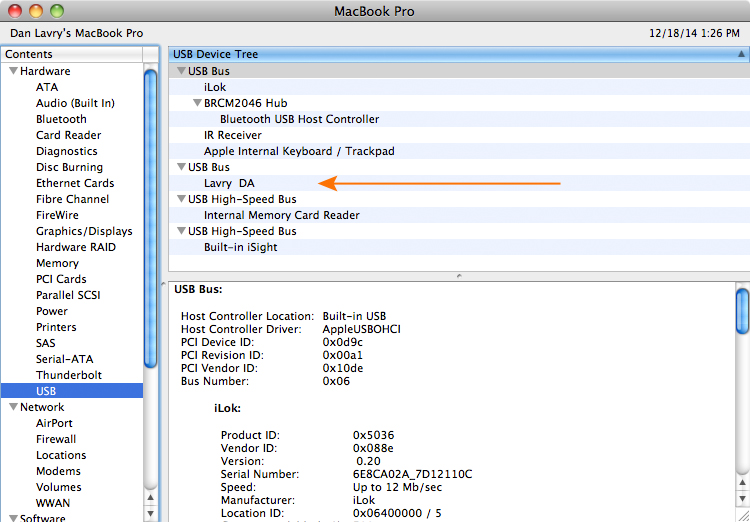
By selecting USB from the Contents column of the System Information or System Profiler dialog, the USB connections are displayed. In this illustration, the Lavry DA is connected to a USB port which is not used by any other devices. This is the ideal scenario, but in some cases it may not be possible. Try to avoid connection to a USB port shared by other high bandwidth or high priority devices such as wireless mouse/keyboards or WiFi connections.
Multiple USB connections
If you want to connect the AD11 and DA11 to the same computer using USB, be aware that this may not work with all computers. If you get a warning regarding bandwidth limitations, or simply cannot get audio into and out of the computer via the Lavry devices, try changing one of the USB connections to a different port. For example, instead of using two front panel USB ports, try using one front and one rear panel ports.
Lavry recommends using an alternative means for connection of the DA11 when the AD11 is connected via USB whenever possible. For example, most Macintosh computers have an optical digital audio output built into the headphone jack. Many PC’s have SPDIF optical or coaxial connections available through the on-board sound. Please note that the output SOUND control panel settings (Audio MIDI Setup/Audio Devices settings in Apple OS) for output SF and Wordlength typically affect on-board sound SPDIF connections in a manner similar to USB. ProTools Macintosh users will need to use this approach because the ProTools aggregate device does not support USB connection of both the AD11 and DA11 simultaneously.
Changes to the OS
OS manufacturers periodically update or release new versions of their software, which can result in changes to the operation of the USB audio. Because the AD11 and DA11 are Class 1 Compliant audio devices, changes to the OS normally do not affect them in the manner third party drivers are affected.
However, third party drivers installed after the OS update could affect the operation of the Lavry unit, if these drivers replace the original OS USB audio drivers. Third party drivers may be included in the software installation of some audio software.
